¶ User Guide
This is the official Nova User Guide in Google Docs. We are continually making updates to this. We welcome feedback on how to improve these docs.
¶ What is Linux
¶ Why Should I learn Linux?
- High security - Linux isn’t controlled by any company and due to its open-source nature doesn’t have hidden functionality that can create intentional or unintentional security concerns
- Open source - anyone can audit the source code
- High stability
- Runs on almost any hardware
- Most variants are free
- Community support
- Hundreds of “distro” choices (variants)
- Many desktop environments from which to choose that can be selected at will
¶ Top Linux Statistics
- 100% of the top 500 supercomputers run on Linux (https://itsfoss.com/linux-runs-top-supercomputers/)
- 90% of public cloud workloads are run on Linux (https://www.cbtnuggets.com/blog/certifications/open-source/why-linux-runs-90-percent-of-the-public-cloud-workload)
- Android constitutes more than 70% of the global mobile operating system market share (https://gs.statcounter.com/os-market-share/mobile/worldwide)
- Linux makes up around 3% of the desktop and laptop market share and is increasing (https://itsfoss.com/linux-market-share/)
- Over 70% of web servers run Linux (https://www.systranbox.com/exploring-how-much-of-the-internet-is-powered-by-linux/)
- 83% of professional developers surveyed agree Linux is the most loved platform for development (https://fossbytes.com/linux-is-the-most-popular-loved-platform-among-devs-stack-overflow-survey/)
- There are over 9,500 Linux games on the Steam platform (https://www.engadget.com/2019-02-19-linux-gaming-steam-valve-epic-games-store.html)
- Microsoft Windows now supports Linux and Android systems and software through Windows Subsystems
¶ Things you will need
- Computer monitor or TV with an HDMI input
- HDMI to microHDMI Cable (or adapter) or HDMI to USB-C cable
- A power outlet into which to plug the power adapter
- A USB Type-A (USB-A) to USB Type-C (USB-C) cable for power (unless the USB-C cable is part of the power supply)
- USB keyboard and USB mouse
- Your excitement!
¶ Setting Up Indiedroid Nova
¶ Step 1: Download Operating System Image for the Nova
We recommend starting with the operating system that we pre-flashed onto the eMMC at ameriDroid. We test each Nova before shipping it to ensure everything is working.
After verifying that your Nova boots with the included operating system image, you may like to try one of the other operating system images on the Indiedroid.us site. We recommend flashing these other operating systems to a microSD or a different eMMC. That makes it easy to get back to the original operating system if you want to by just plugging the original eMMC back in.
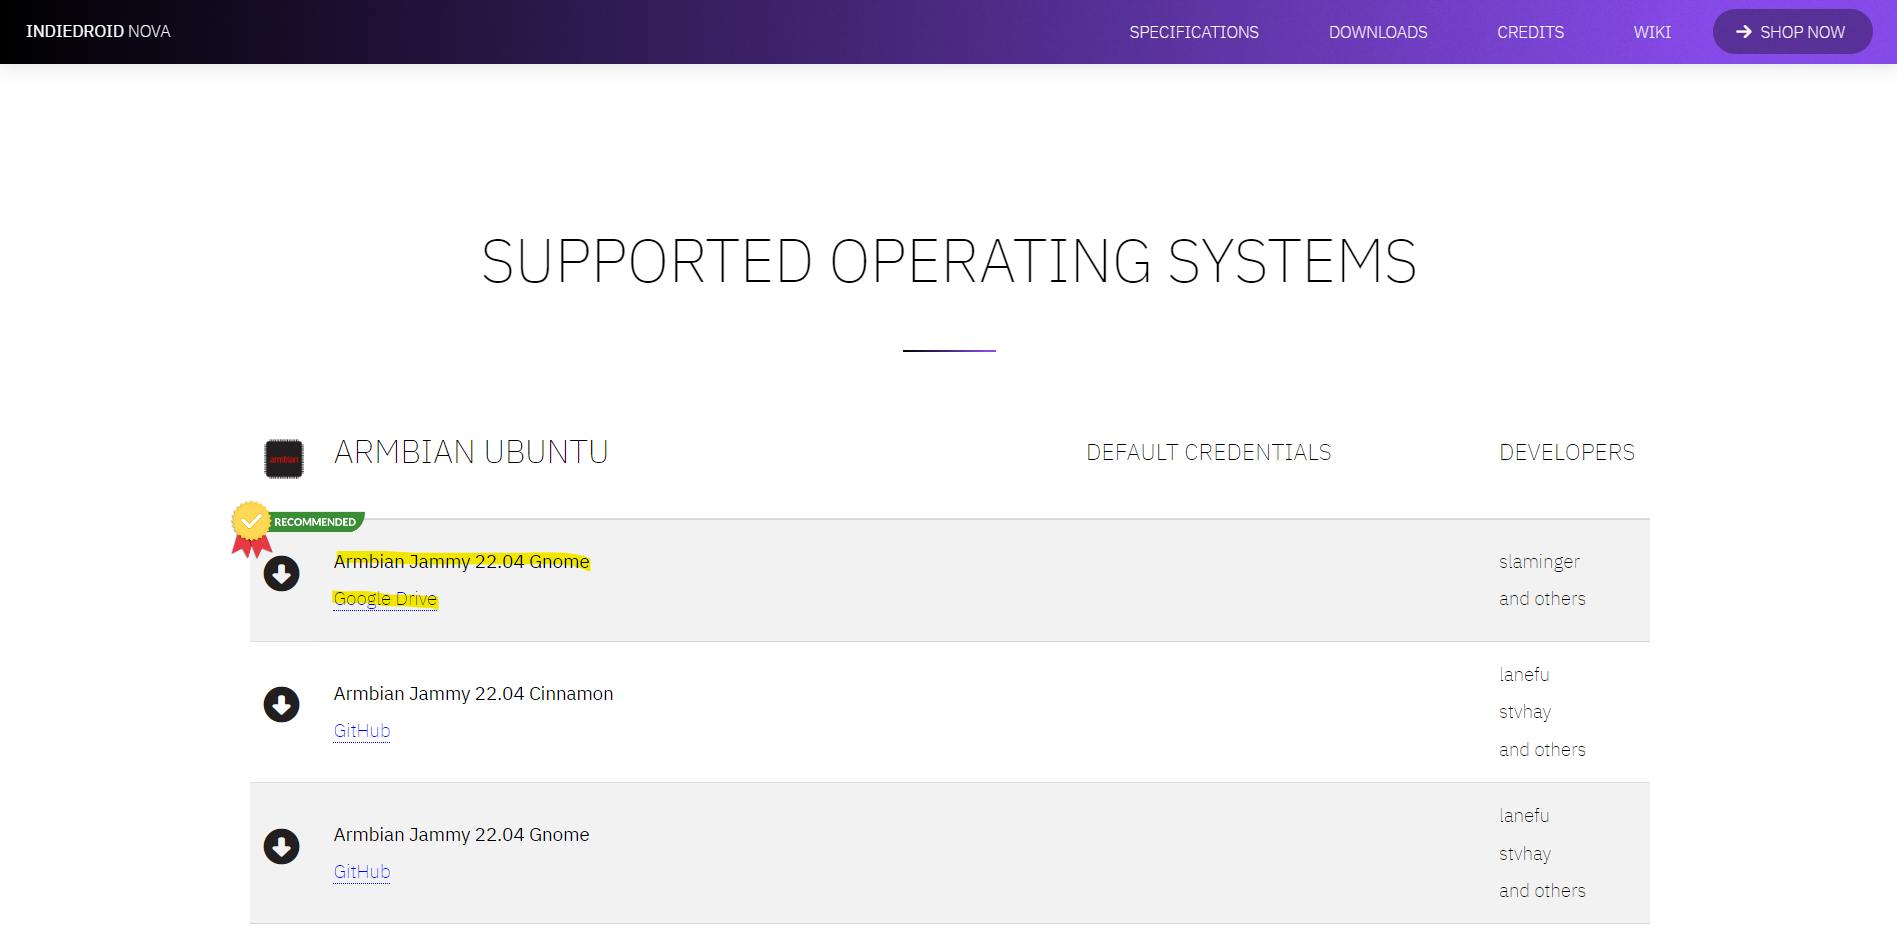
To get started, go to a computer with an Internet connection, head over to http://indiedroid.us/software and choose the operating system that you would like to install. For our purposes, we selected Armbian Gnome Desktop developed by Indiedroid community member, slaminger.
We recommend flashing to eMMC if at all possible. eMMC is much faster and more reliable when compared to microSD cards. However, microSD cards are generally cheaper and are easier to find as many consumer devices like phones, digital cameras, dashcams, etc. use them.
If you’re flashing to microSD, use one of the below methods:
- Look for a microSD slot on the computer and use that
- Look for a full-sized SD slot on the computer and use an SD to microSD adapter like this: https://ameridroid.com/products/microsd-to-sd-adapter
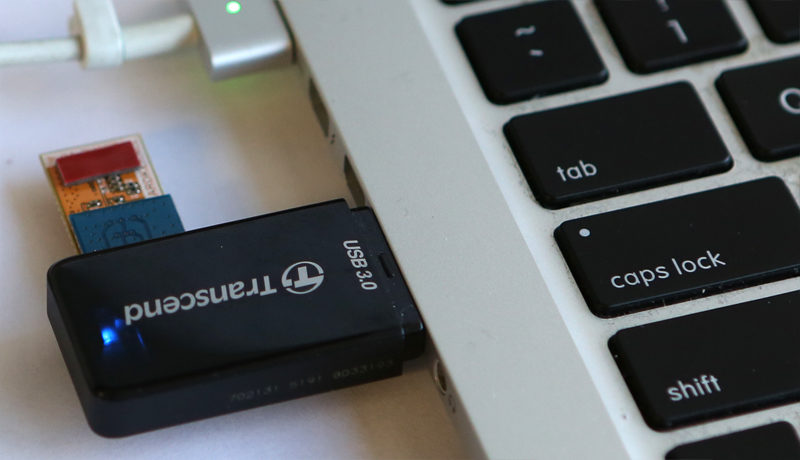
- Use a USB to microSD adapter like this: https://ameridroid.com/products/transcend-usb3-0-microsd-adapter
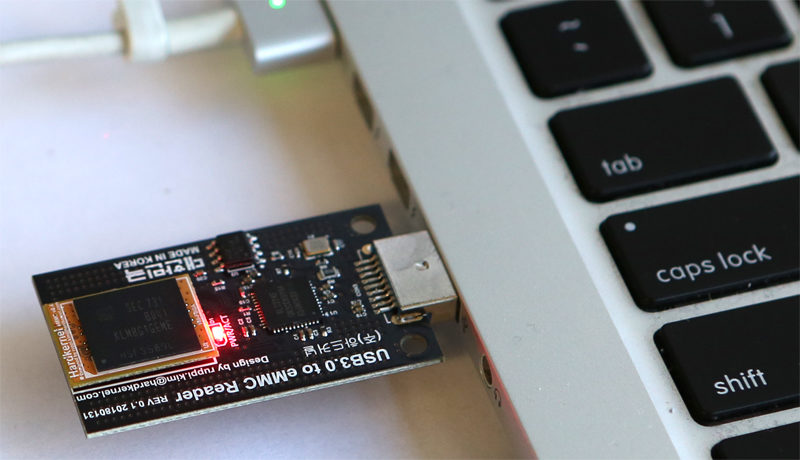
- Use an eMMC to USB adapter like this: https://ameridroid.com/products/usb-3-0-emmc-module-writer-2
¶ Step 1A: If Installing to eMMC, Remove Bottom Heatsink Plate on Nova
Using a screwdriver, remove all 4 screws from the bottom plate. This will allow you to remove the plate and have access to the eMMC port. How to access eMMC on Indiedroid Nova - Simple YouTube tutorial
¶ Step 2: Flash the Downloaded Operating System to the microSD or eMMC
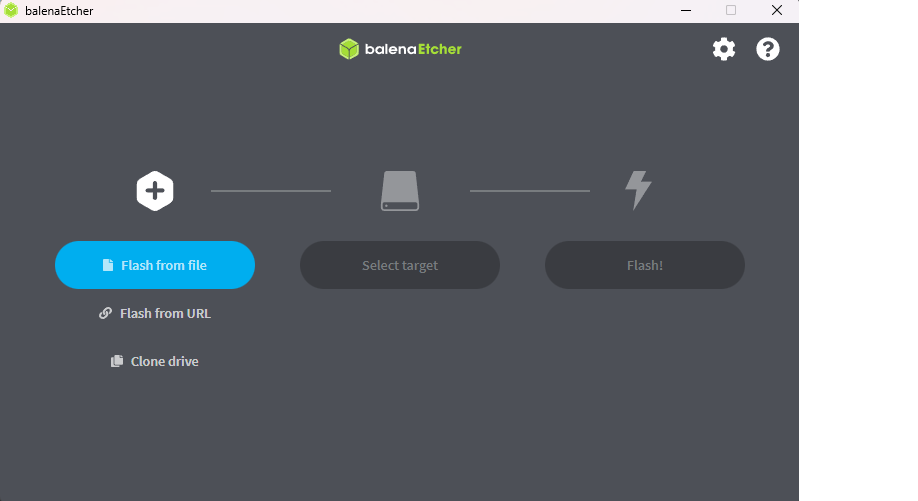
Once you have downloaded the image, open the flashing software and choose "flash from file". We recommend using balenaEtcher for this. Navigate to the downloaded image (usually in the logged-in user’s Downloads directory) and select it. Next, select your desired storage location (eMMC or microSD card) by clicking "select target". Finally, click "flash" to start the flashing process.
NOTE: See Appendix A in this guide for additional information on flashing microSD/eMMC cards.
¶ Step 3: Insert eMMC or microSD Card into the Nova
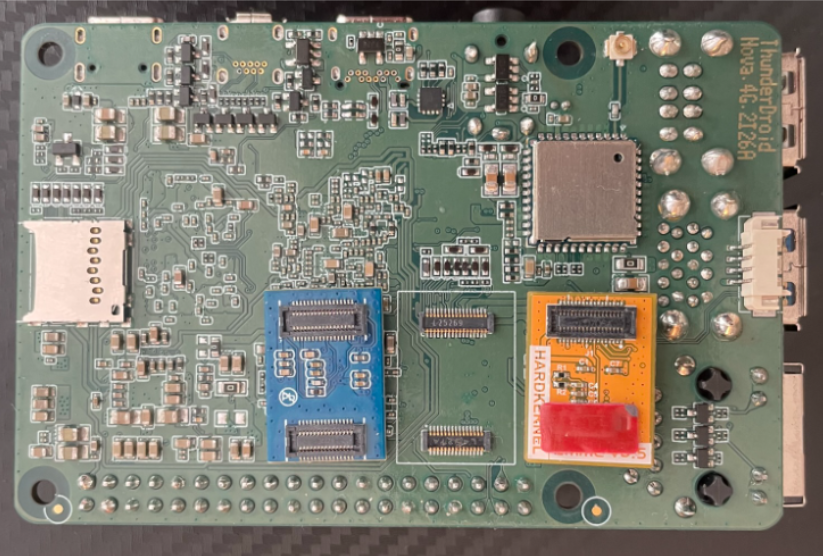
The image below shows the bottom side of two different types of removable eMMC boards that are compatible with the Nova, along with the connectors for the eMMC on the Nova. Flip the eMMC over so the eMMC connector(s) are aligned with the connectors on the Nova and push until it clicks. The second connector on some eMMCs is just to hold the eMMC on the Nova more securely and doesn’t actually transmit any data or power between the eMMC and the Nova.
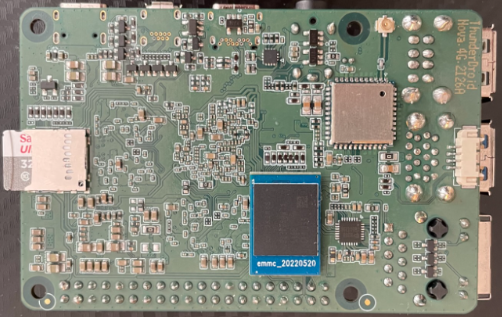
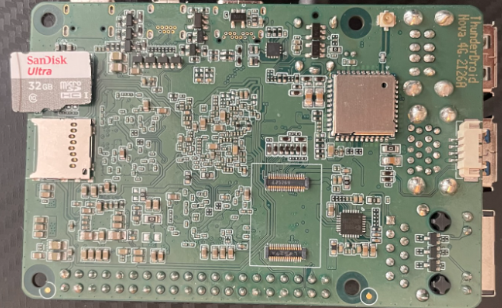
For the microSD card slide it into the microSD card slot as shown on the 2nd and 3rd images on the previous page. It is possible to have the eMMC and microSD card both available on the Nova at the same time.
¶ Step 4: Connecting Accessories
For the final steps:
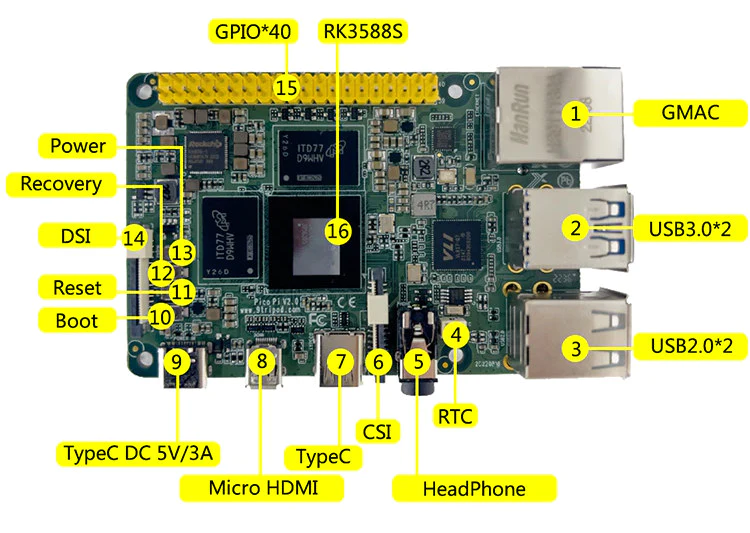
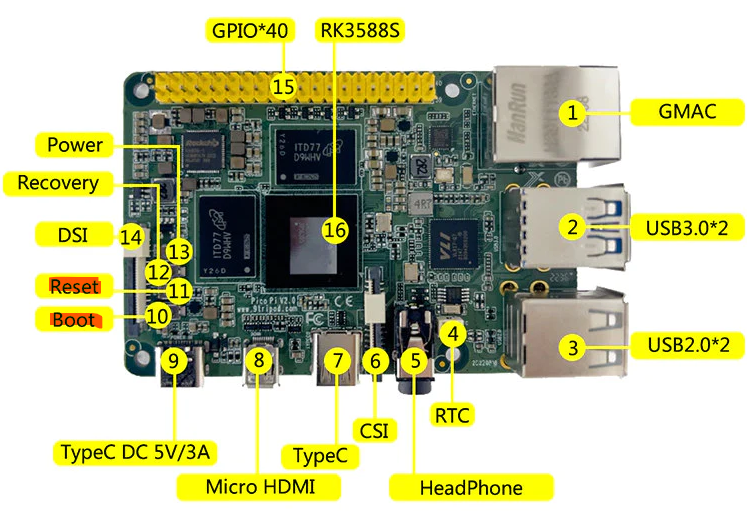
- Connect the microHDMI or USB-C cable to the microHDMI (8) or USB-C (7) port on the Nova and the other end to the HDMI port in your monitor.
- Connect a mouse and keyboard to the USB Ports (2, 3) to navigate on the OS.
- Connect the Power Supply to the USB-C (9) DC 5V/3A port.
- Enjoy Linux on your hand-size computer.
¶ Step 5: Update Linux
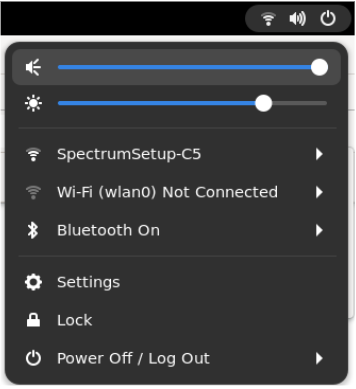
After the first boot, it is always a good idea to update Linux. Connect to a WiFi network (using the WiFi icon in the taskbar) or plug in an Ethernet cable connected to your network. Press the 3 keys CTRL+ALT+T to open the terminal, or simply look for terminal in the search bar
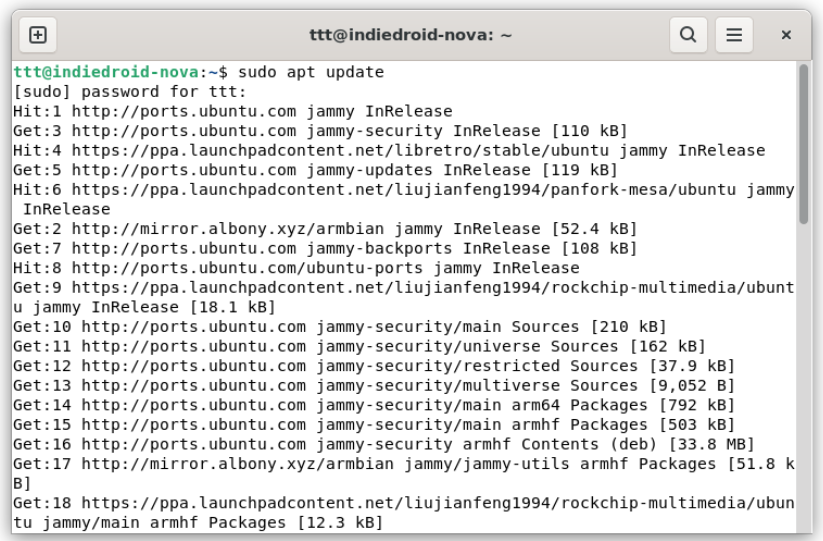
Next, use these following commands:
- sudo apt update
- sudo apt upgrade
- sudo apt dist-upgrade
- sudo reboot
¶ Appendices
¶ Appendix A: Flash your eMMC or microSD with different Operating Systems.
¶ Step 1: Connecting eMMC to your computer
You can connect your eMMC to your computer using adapters like shown in the pictures below.

¶ Step 2: Flash eMMC using balenaEtcher
First, download balenaEtcher from https://www.balena.io/etcher/. Next, download the image of the desired operating system from http://indiedroid.us/software
Now, run balenaEtcher and select the “Flash from file” option and find the operating system file that was just downloaded.
Next, click “Target” and select the eMMC Module, microSD card or “Compute Module”.
Once the correct target is selected, click “Flash!”
Flash eMMC Simple YouTube tutorial
¶ Appendix B: Flash your eMMC or microSD Using Rkdevtool
¶ Step 1: Install Driver
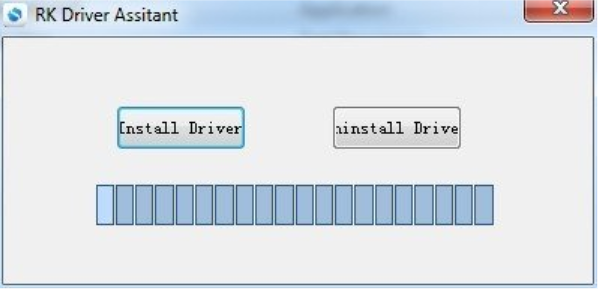
Download the Driver for Windows from https://dl.radxa.com/tools/windows/DriverAssitant_v5.0.zip, unzip the folder, run the RK Driver Assistant and hit Install Driver. Reboot your computer.
¶ Step 2: Install rkdevtool
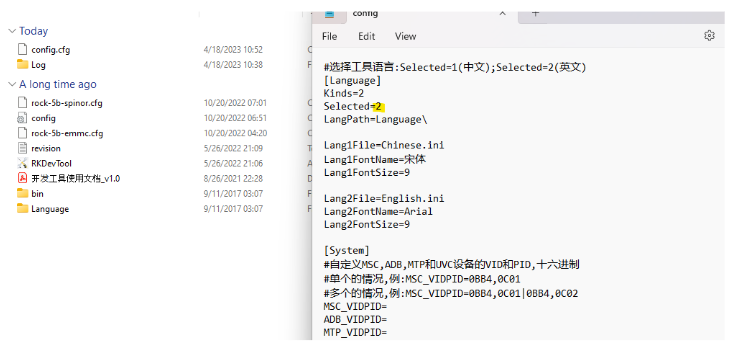
Download the compressed folder https://dl.radxa.com/tools/windows/RKDevTool_Release_v2.96-20221121.rar, unzip it, and open config.ini.
Then, change the value of "selected" to 2 to switch the language of the tool to English.
After that, connect your Indiedroid Nova to your computer or laptop using a USB-C to USB-A cable, making sure to connect the USB-C end to the display USB-C port (the one right next to the Audio port) and then connect another USB-C cable to the power port on the board. Finally, open the RKDevTool, which should automatically detect your device, if your device is not automatically detected please press the button Boot and Reset at the same time. If that does not work, disconnect the USB-C from the power, press both Boot and Reset, connect the USB-C power and let go of Reset, keep Boot pressed for a few seconds.
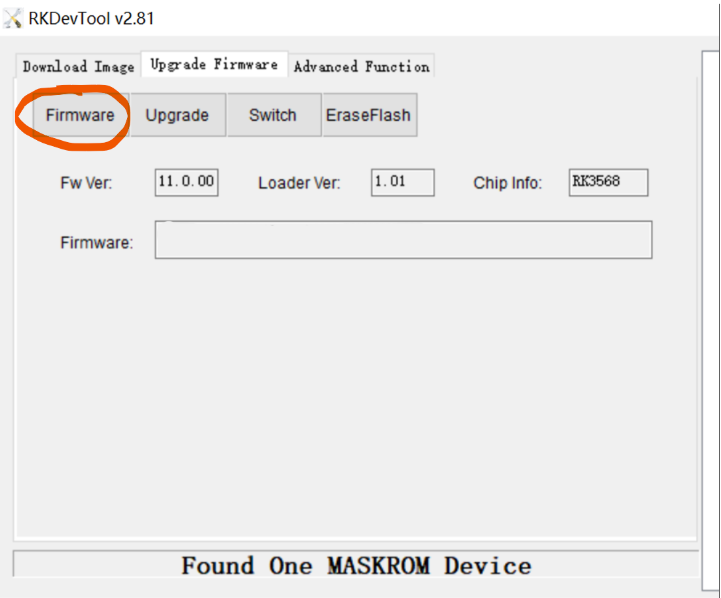
You can then use the tool to flash images that are compatible with the tool. Keep in mind that if you have both eMMC and microSD connected, the board will boot from microSD first.
After your device is detected as a MASKROM Device, go to the “Upgrade Firmware” Tab, click firmware and search for the file that you want to flash, then click upgrade.
¶ Appendix C: Installing the Fan on top of the Heatsink
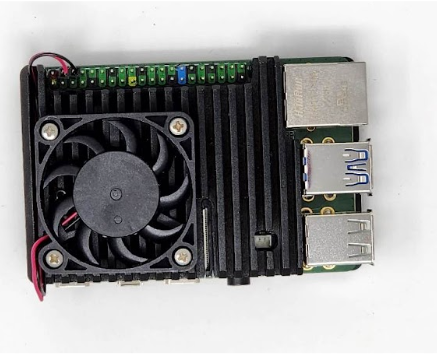
You can mount the fan on top of the heatsink, even if it doesn't have any specific screw holes threaded into the heatsink. The fins on the heatsink are spaced so that good quality M2.5 metric screws of at least 7mm in length will cut their own threads. The fins are spaced perfectly for fans with mounting holes spaced on 5mm centers, such as 30, 35 or 40mm. Simply line the screw holes on the heatsink with the fins, and using a quality screwdriver with the correct-sized tip for the screws being used, securely screw the screws in place.
¶ Appendix D: Interesting Notes About Power Supplies
Did you know that almost all electronic devices are designed to work with a specific voltage (V), or range of voltages? It’s easiest to use the power supply recommended by the manufacturer. However, in some cases it may be necessary to find a different power supply.
- If the device has a USB Type-C (USB-C) port for power, make sure you know the voltage that the device is designed for. For instance, the Indiedroid Nova is designed for 5V. It usually won’t work if you try to plug the Nova into a USB-C power port - plug it into a USB Type-A power port instead.
- When deciding whether or not to connect a power supply to a device, check to make sure the voltage (V) of the power supply is in the range required by the device, not more or less.
- Check the amperage (A) of the power supply. Make sure the power supply amperage is equal to or greater than the amperage requirements specified by the device.
- If the amperage is listed in mA, simply move the decimal three digits to the left to find out how much it is in amps. For instance, 1500mA = 1500.0mA = 1.5A. Again, this number should be equal to or greater than the amperage the device calls for.
- In some cases, it is possible for the device to draw more power than what is specified under “normal” operation. For instance, if a USB device is connected that draws a lot of power, like an external hard drive, it can require more power from the device than is stated for “normal” operation.
- These reasons (and others) are why we recommend particular power supplies for each device.